5/1/2019


4/1/2019

6/4/2018
My charging circuit as it's organized on the engine side of the firewall. The cabin side is also shown, but that is just schematic.
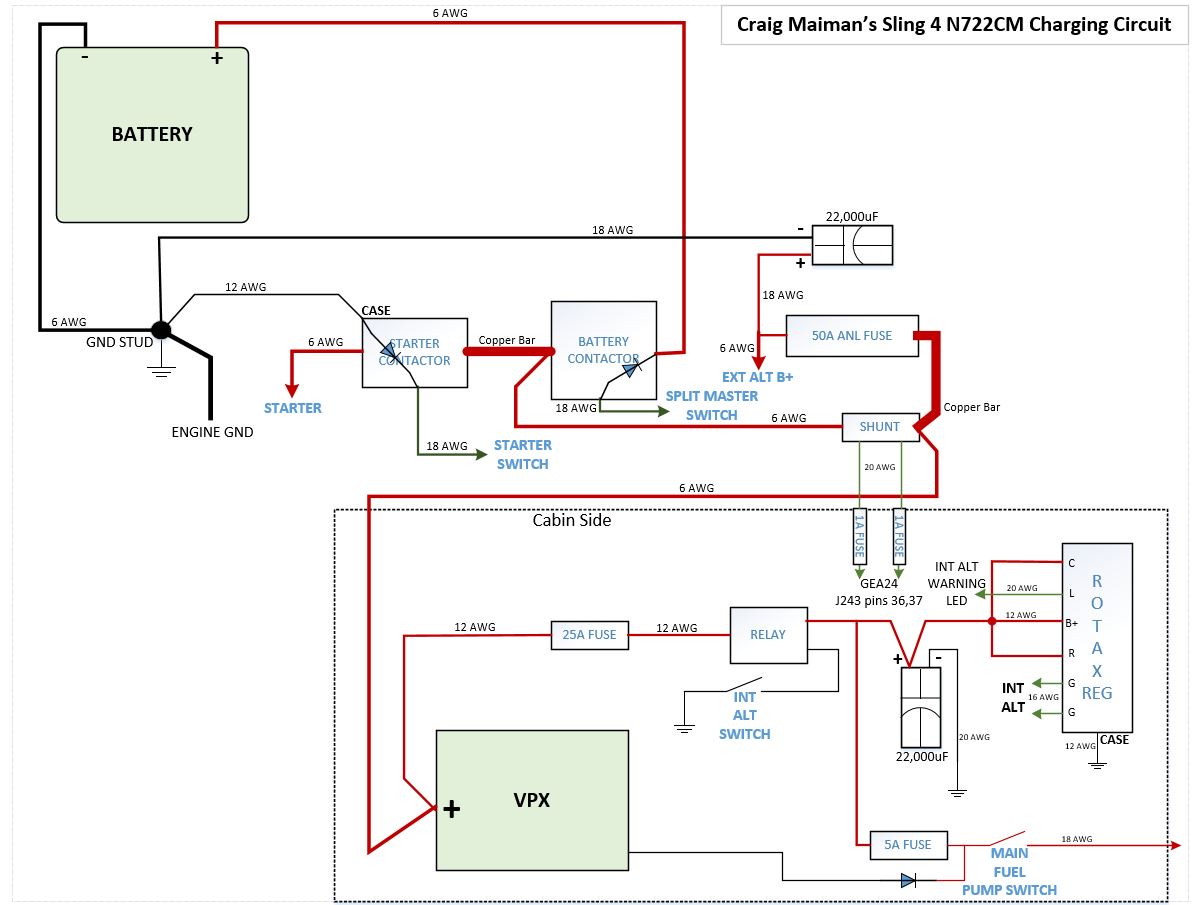
Supplemental info regarding the regulator, fuel pumps and some wire sizing.

Same comment.

4/1/2019
With the fasteners on my firewall complete, I figured I'd provide a labeled photo of it for other builders.

Note that there should be two M5 rivnuts for the starter relay but my photo only shows one. That's because I had to abandon the holes already there because they ended up slightly too large and the rivnut spun.
Any holes that will not be used I covered with aluminum tape.
You'll also note that I painted my firewall. This is obviously optional and most people have not done this. This paint is a fire-resistant paint that expands into a foam on exposure to fire and will prevent fire from even getting to the metal of the firewall for a very long time (an hour...). This is the paint I used. Note that the firewall, which is galvanized, must be prepped properly to take any coatings (cleaned, sanded, cleaned again, primed, etc...). I did this because I'm not a fan of fire in the cockpit... :-O
6/4/2018
I wanted to document what's mounted on the firewall and here is my latest information.
Here are the two firewall-related diagrams from the manual:
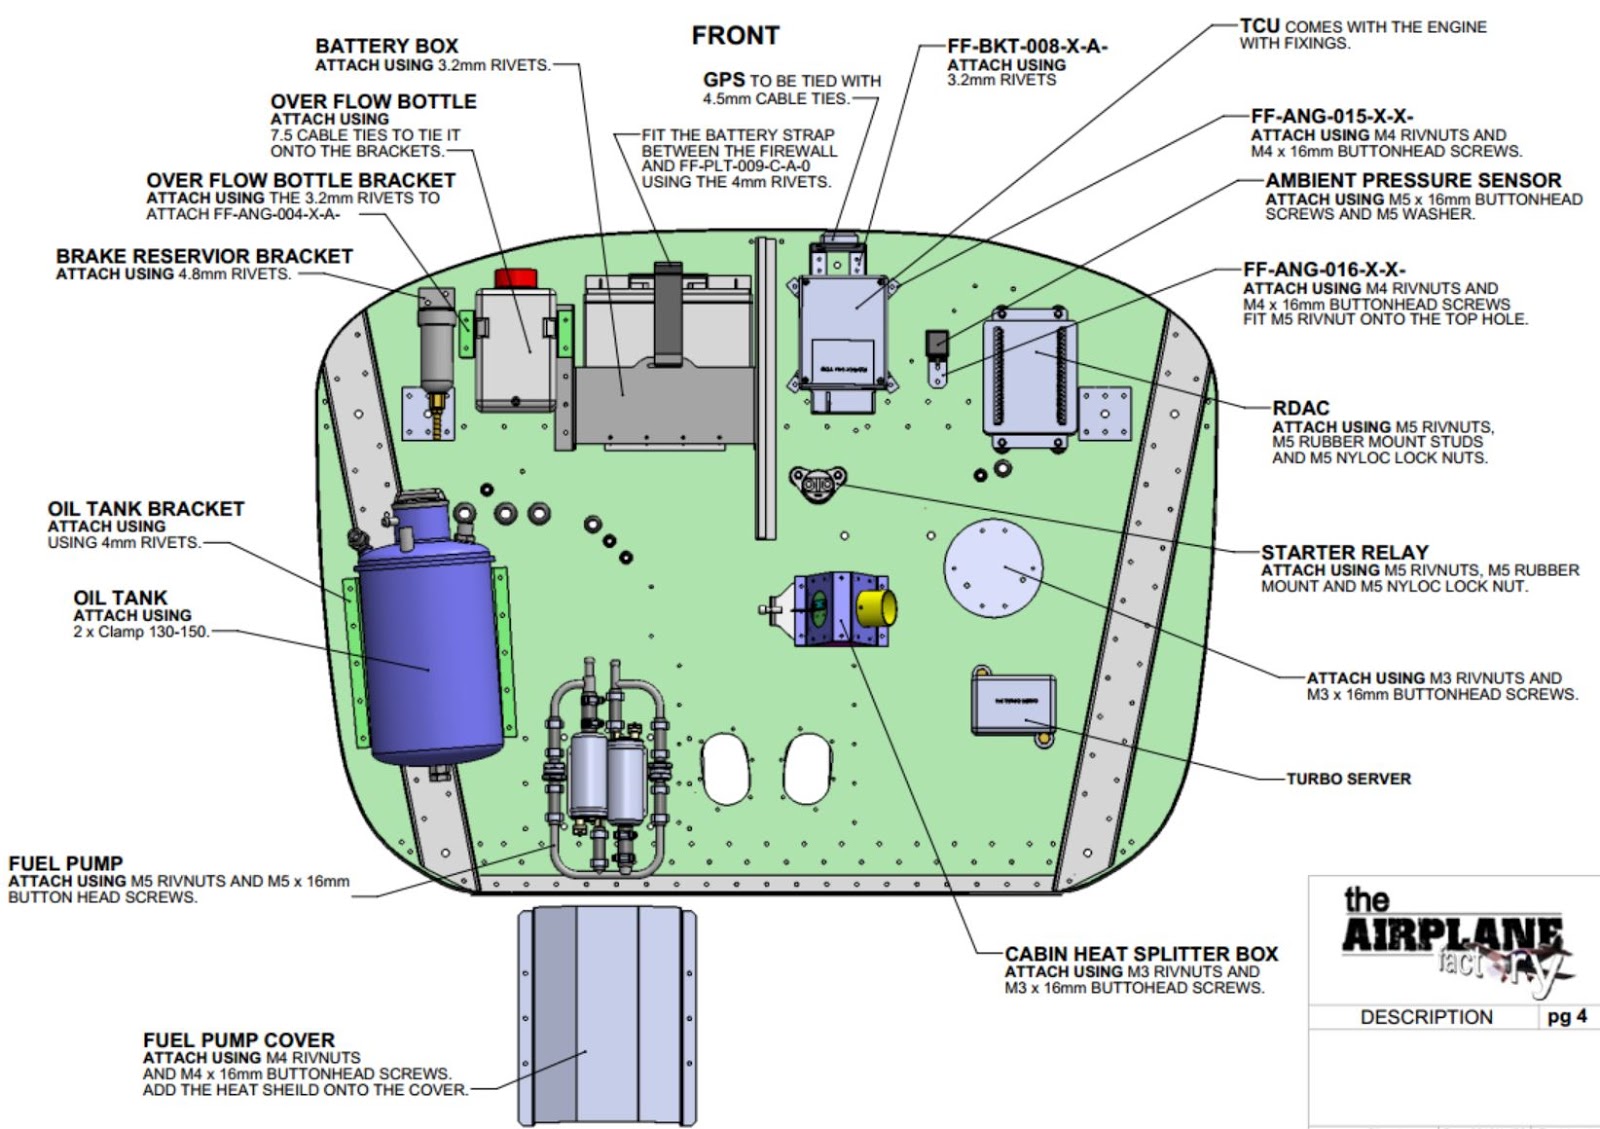

On the engine side I know these won't be installed (Rotax recommends cabin side): TCU, Turbo Servo, Ambient Pressure Sensor and RDAC (I believe that's an MGL box). On the cabin side these will be additionally installed: TCU, Turbo Servo and the pressure sensor.
So, given that, I understand the following are the items on the engine side:
- 2 GPS brackets and units: One for G3X and one for 650
- Fuel Pump & cover
- Oil Tank/Bracket
- Brake Reservoir & Bracket
- Overflow Bottle & Bracket
- Battery Box & Battery
- Starter Relay (and diode)
- Master Relay (and diode)
- Cabin Heat Splitter Box
- 2 Slow-Blow fuses (your circuit may be different)
- TCU
- Turbo Servo
- Ambient Pressure Sensor
- Grounding Bolt
- Missing anything?
On the cabin side we have:
- Regulator
- Cabin Heat Inside Cover
Cables, wires, etc. that pass through the firewall:
- Brake Line
- Fuel Line
- Fuel Return Line
- Throttle Cable (manual shows 2??)
- Engine Choke Cable (manual shows 2??)
- Heater Cable
- Engine Monitor Cable Harness
- TCU Cable Harness
- Turbo Servo Harness (?)
- Electrics Earthing Cable/Bolt
Well.... The Airplane Factory fitted a 915 to the Sling and it turns out they're making a bunch of aerodynamic and structural changes to the airframe to take advantage of the greater power of the engine. Basically, I would only see a marginal performance increase and it would end up costing me a lot more to use the engine. Not worth it for me...
So, I'm back to using the stock 914... At some point in the future I could still use an aftermarket fuel injection system from EdgePerformance to get a bit of a power boost, while saving fuel.
Updated 9/9/2017
I've decided definitively to go with the Rotax 915iS and it's on order with The Airplane Factory. It's scheduled to be delivered in the February/March time-frame.
Updated 1/17/2017
The Sling 4 is designed for the 115 hp Rotax 914 Turbocharged engine, though of course, since it's an experimental design you're free to do whatever you like for an engine.
Since I would prefer a fuel injection system vs. the Bing carbs I've done a lot of research on a fuel injection kit for the Rotax from EdgePerformance in Norway. There are a couple of Facebook pages that cover them: This page and this group.
Looks like there are several options I could pursue. See here for the source of the various kits mentioned below. See here for pricing on the various versions of Rotax engines.
From easiest conservative path to more radical and time consuming (though you could have an engine shop build these for you):
- Use stock Rotax 914 as is.
- Using 914, replace the Bing carbs and ECU (Engine Control Unit) with EdgePerformance's EFI kit (4-1 Intake version). This option would have a modest performance increase, but perhaps ~20% fuel consumption improvement. I don't know much about the ECU, so it may or may not be as redundant and robust as the Rotax system.
- Use 912 (80hp version), turbocharge (or supercharge) it and add EFI kit. This should be the equivalent of #2 above but perhaps much cheaper (though more work). See here for more info on this and #4 below.
- Use 912 (100hp version), turbocharge (or supercharge) it and add EFI kit. Not sure of the resultant HP here.
- Use 912 (100hp version?), turbocharge (or supercharge), add EFI kit and change cylinders to bigger bore (various sizes available). Most power, most work. See here for more info on the various big bore kits.
Added 4/13/2016
I've been made aware of another option for the engine. It is taking a 912 ULS (carbs) and adding a supercharger from the Italian company Flygas. More info here.
Added 1/17/2017
I'm starting to think I don't want to wait for the 915 and I've also heard that it could run up to $10k USD more than the 914... That's a big chunk of change for 15 more HP and slightly lower fuel consumption.
My current thinking is to either go with the 914 or option #4 above, which is this kit from EdgePerformance. Compared to the 914 it's got higher HP (up to 154 HP, but I'd probably dial back the boost to make it 130 HP), lower fuel consumption, fuel injection (no carb icing, no carb sync'ing, no vapor lock issue, no cold weather start issues) and it's the same price as the 914. And, oh, you can fly faster... Mindful of Vne of course, but still, faster.