Subcribe to our RSS feeds Join Us on Facebook Follow us on Twitter Add to Circles

Categories

Thursday, March 31, 2016

2 hrs. fabricating the mounting plate for the wing tip lights.

Bought a couple of sheets of 6061-T6 aluminum.  One .025" thick (mounting plate thickness) and the other .040" (other possible needs down the road).

The plate shape outline.

Cutting them out with my snips.

The rough cut.

And after filing smooth and scotchbriting.

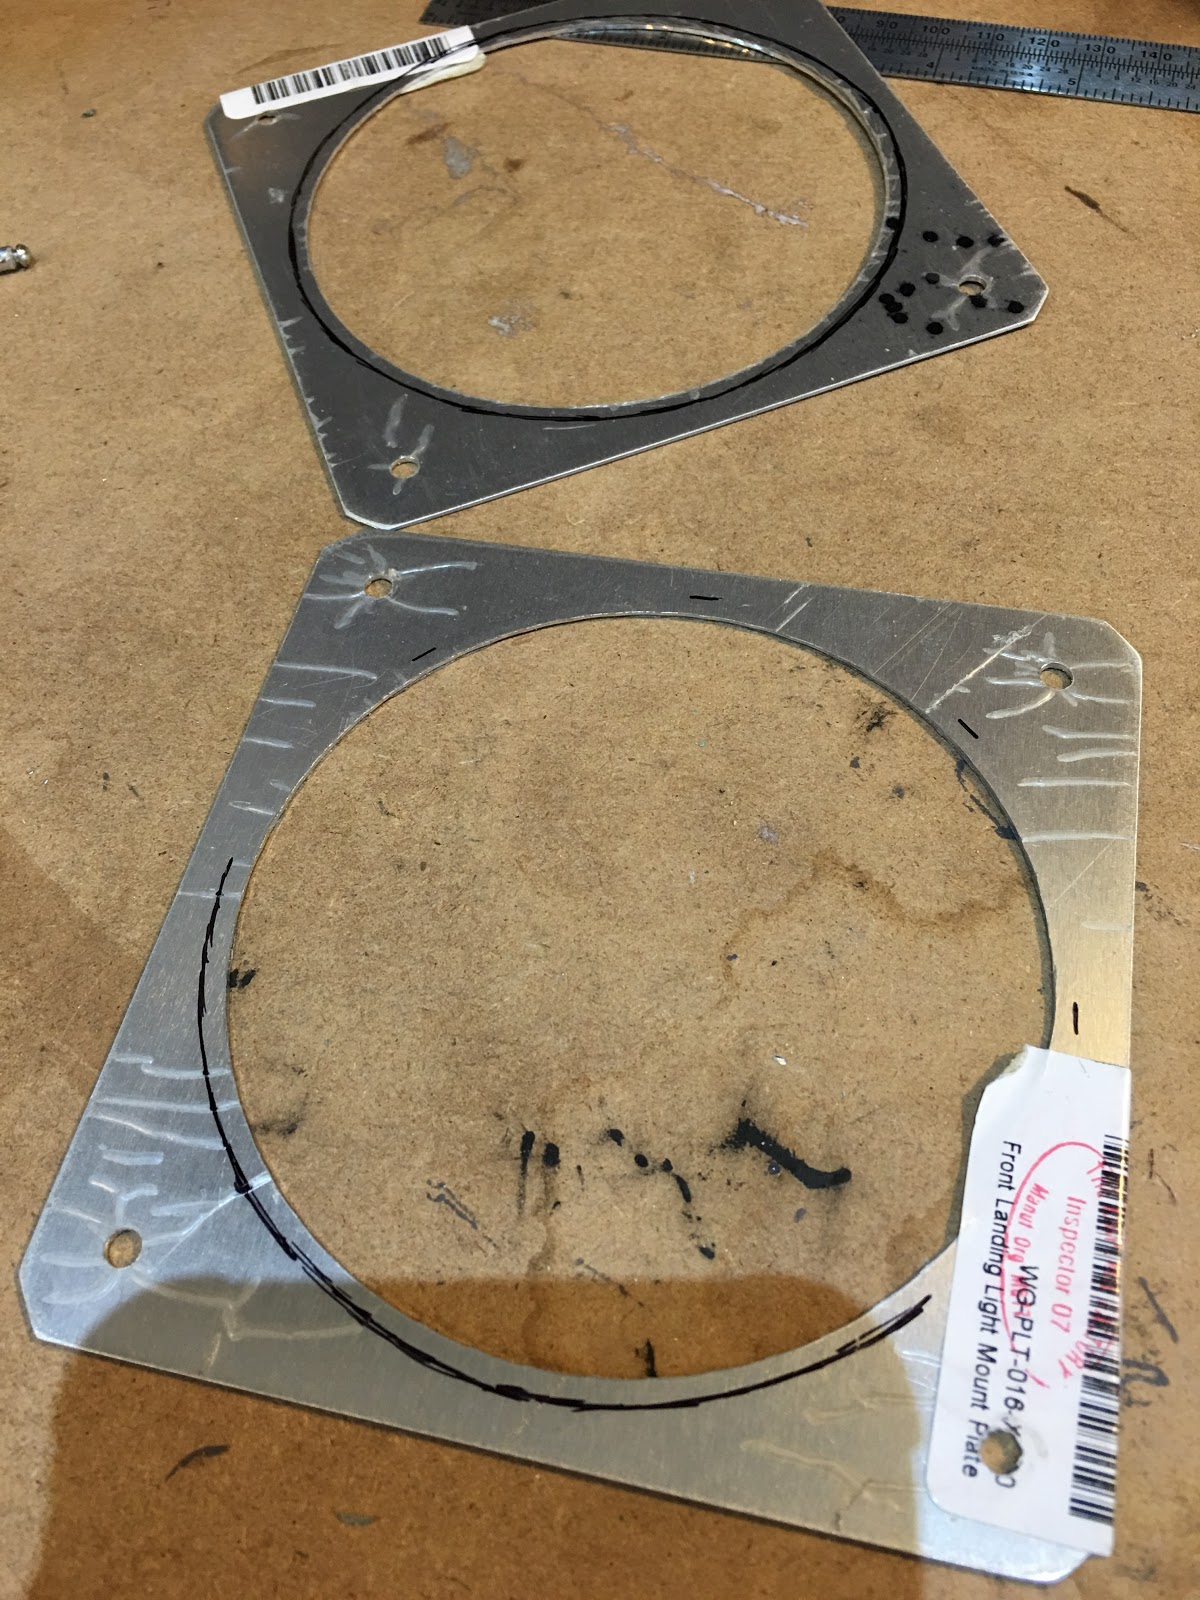
Figuring out where the holes go...

And it's done!

Did an interview yesterday for my local paper and also taped a segment for the town TV station.  It will all be online next Thursday, so I'll post links to it here.  Very cool!

NEXT TASKS:
  1. Rivet the one on the step rib that needs special handling.  OK, I've been putting this off..
  2. Finish drilling the holes on the bottom of the tip (will require moving the wing so I can get under it with a drill).
  3. Remove tip and install the light mounting plate and light and solder the wire connections.
  4. Tip riveted in place.
  5. Composite filler for join between wing tip and skins. Perhaps other seams can use some filler?
  6. Put the aileron and flap on the wing to check for straightness of the trailing edge (Thanks Peter, I saw that on your blog! ;-)). Based on what I'm reading online it seems likely that I'll need to re-rivet some of the aileron/flaps to line up the trailing edges...  Wish I knew this before I had riveted them...
  7. Finish right wing.
  8. Finally finish one of the composite tips of the elevator.
  9. Fill rivets of elevator with Bondo.
  10. START ON FUSELAGE!

Tuesday, March 29, 2016

1 hr. cleaning up my shop because a local paper reporter (and possibly local TV) is coming tomorrow to interview me for an article in the paper.  If it makes it to an accessible online article I'll post the link here.

Nice and clean and organized. :-)

Ordered M5 rivnuts, countersunk stainless steel machine screws (45mm long) and some 6061-T6 sheets to fabricate and install my lights.  I'll make a plate slightly larger than the black felt gasket in the picture.  My plan is to drill 4 holes in the fiberglass for this.  The 3 holes shown, which are for the mounting screw, wire bundle and post; and I'll add another near the tip to put in another rivnut to better secure the plate to the fiberglass.

Monday, March 28, 2016

2 hrs. fitting the fiberglass tip to the left wing.

Sanding down the trailing edge of the tip in order to fit.

Found two un-riveted holes in the spar (not something I riveted).  Wasn't able to get the pneumatic in there, but was able to do them by hand.  It's the two on the far left bottom of the spar (the only two rivets done the other direction).

Multiple fittings to make sure it was in on the top and bottom the proper amount - not too far and not too shallow....  I measured the distance from the skin edge to the end rib and marked that on the tip at various places to help get it right.

Measured the angle (1.05 deg) to make sure I have the same angle on the other wing when I do that.

My procedure was to drill with a slightly small drill bit (to avoid too much grinding of the skin because it takes several seconds to get through the flexible fiberglass) and then exact size it with a chucking reamer bit.  That worked very well.

All of the top holes are done and about a third of the bottom holes.  I'll need to move the wing in order to get a drill under there so I can finish them.  Meanwhile I can't rivet it until I figure out the nav/pos light fitting issue and do that installation (and wiring of course).

NEXT TASKS:
  1. Rivet the one on the step rib that needs special handling.  OK, I've been putting this off..
  2. Light installation after I figure out the "hole" issue...
  3. Tip riveting.
  4. Composite filler for join between wing tip and skins. Perhaps other seams can use some filler?
  5. Put the aileron and flap on the wing to check for straightness of the trailing edge (Thanks Peter, I saw that on your blog! ;-)). Based on what I'm reading online it seems likely that I'll need to re-rivet some of the aileron/flaps to line up the trailing edges...  Wish I knew this before I had riveted them...
  6. Finish right wing.
  7. Finally finish one of the composite tips of the elevator.
  8. Fill rivets of elevator with Bondo.
  9. START ON FUSELAGE!

Sunday, March 27, 2016

4 hrs. riveting the end rib in place.

Oops, need to drill out that rivet (and one on the bottom)...

Need to take out the Styrofoam insert from the tip (which is glued in...).  Carefully using a utility knife to get between the foam and the fiberglass.

And it's out...

Sanded off any left-over styrofoam and glue and wiped it down with a wet paper towel.

Seems to fit reasonably well.

Want to make sure that the tip is consistently angled between each wing.

Angle brackets riveted in!

End rib cleco'ed in place.

Put in a wire tie to hold up the wire off the bottom skin.

And it's all riveted in place!

Head scratcher: The post, wire bundle and mounting hole in the light do not line up with the backing plate which goes on the inside of the tip.  Hmmmm.....  And I didn't see any mounting bolt in the box the lights came in.  More hmm....

NEXT TASKS:
  1. Rivet the one on the step rib that needs special handling.  OK, I've been putting this off..
  2.  Light installation after I figure out the above "hmmm's"...
  3. Tip fitting (probably need to sand the trailing edge to get it to fit) and riveting.
  4. Composite filler for join between wing tip and skins. Perhaps other seams can use some filler?
  5. Put the aileron and flap on the wing to check for straightness of the trailing edge (Thanks Peter, I saw that on your blog! ;-)). Based on what I'm reading online it seems likely that I'll need to re-rivet some of the aileron/flaps to line up the trailing edges...  Wish I knew this before I had riveted them...
  6. Finish right wing.
  7. Finally finish one of the composite tips of the elevator.
  8. Fill rivets of elevator with Bondo.
  9. START ON FUSELAGE!

Saturday, March 26, 2016

2 hrs. finishing the bottom rivet filling and starting fit of wing tip assembly.  Finally back at it after a business trip this week.

The leading edges underneath are done (managed to do it without flipping the wing).  When the wing is on the shelf I'll be able to more easily pull the tape on the bottom. 

The wing is off the tip jig!

The tip rib and assembly test fit.

Fits right in!

Other angle view.

Composite tip fits in.  Need to be totally sure of the angle that this fits in before committing to any riveting.

Getting ready to fit the tip light.  This will be done before fitting the tip in the wing.

NEXT TASKS:
  1. Rivet the one on the step rib that needs special handling.  OK, I've been putting this off..
  2. Wing tip assembly riveted on and light installation.
  3. Composite filler for join between wing tip and skins. Perhaps other seams can use some filler?
  4. Put the aileron and flap on the wing to check for straightness of the trailing edge (Thanks Peter, I saw that on your blog! ;-)). Based on what I'm reading online it seems likely that I'll need to re-rivet some of the aileron/flaps to line up the trailing edges...  Wish I knew this before I had riveted them...
  5. Finish right wing.
  6. Finally finish one of the composite tips of the elevator.
  7. Fill rivets of elevator with Bondo.
  8. START ON FUSELAGE!

Monday, March 21, 2016

2 hrs. breaking my back trying to fill the rivets on the bottom of the leading edge and fuel tank...  May need to flip it over or just put it off for now...

Just too difficult to do this upside down.  Was hoping to avoid having to flip it to do it, but I don't think I can finish it like this.

NEXT TASKS:
  1. Finish the bottom rivet filling.
  2. Rivet the one on the step rib that needs special handling.
  3. End rib installed (Jig needs to come off).
  4. Wing tip assembly riveted on and light installation.
  5. Composite filler for join between wing tip and skins. Perhaps other seams can use some filler?
  6. Put the aileron and flap on the wing to check for straightness of the trailing edge (Thanks Peter, I saw that on your blog! ;-)). Based on what I'm reading online it seems likely that I'll need to re-rivet some of the aileron/flaps to line up the trailing edges...  Wish I knew this before I had riveted them...
  7. Finish right wing.
  8. Finally finish one of the composite tips of the elevator.
  9. Fill rivets of elevator with Bondo.
  10. START ON FUSELAGE!

Sunday, March 20, 2016

3 hrs. installing the landing lights.

The brackets had to be enlarged for my lights.

Using a grinding bit on the Dremel was better than using a nibbler.

Done.

Since the brackets float I had to temporarily tape them to hold them together while screwing them in.

The outer bolts in first.  The order of parts from the outside: bolt, front plate, light, back plate, spring and then into the rivnut.

And they're in!

And they work!  :-)

NEXT TASKS:
  1. Finish the bottom rivet filling (will try without flipping).
  2. Rivet the one on the step rib that needs special handling.
  3. End rib installed (Jig needs to come off).
  4. Wing tip assembly riveted on and light installation.
  5. Composite filler for join between wing tip and skins. Perhaps other seams can use some filler?
  6. Put the aileron and flap on the wing to check for straightness of the trailing edge (Thanks Peter, I saw that on your blog! ;-)). Based on what I'm reading online it seems likely that I'll need to re-rivet some of the aileron/flaps to line up the trailing edges...  Wish I knew this before I had riveted them...
  7. Finish right wing.
  8. Finally finish one of the composite tips of the elevator.
  9. Fill rivets of elevator with Bondo.
  10. START ON FUSELAGE!

Saturday, March 19, 2016

5 hrs. over the last 2 days filling the rivets on the top of the left wing.  My next batch of rivets I'm going to try a different approach to compare.  6 hours to do one side of a wing seems like too much.

Filled with Bondo!

Sanded off and pulling the tape.

Voila!

Close-up.

NEXT TASKS:
  1. Rivet the one on the step rib that needs special handling.
  2. Install landing lights.
  3. Flip wing to finish the rivet filling on the bottom (Ugh).  Flip back over...  Tempting to try without flipping it over, so I may do that...
  4. End rib installed (Jig needs to come off).
  5. Wing tip assembly riveted on and light installation.
  6. Composite filler for join between wing tip and skins. Perhaps other seams can use some filler?
  7. Put the aileron and flap on the wing to check for straightness of the trailing edge (Thanks Peter, I saw that on your blog! ;-)). Based on what I'm reading online it seems likely that I'll need to re-rivet some of the aileron/flaps to line up the trailing edges...  Wish I knew this before I had riveted them...
  8. Finish right wing.
  9. Finally finish one of the composite tips of the elevator.
  10. Fill rivets of elevator with Bondo.
  11. START ON FUSELAGE!

Thursday, March 17, 2016

1 hr. riveting the 3 rivets on the bottom and taping the top skins and leading edges for Bondo filling.

Had to use a hand riveter to get the two near the pitot.  Hard to pull!!  The 3rd rivet on the bottom was done by shortening the rivet (there was a rib not far under the skin).

Taped up all the rivets and started to sand the tops off.

Using course sandpaper the tops come right off.

NEXT TASKS:
  1. Rivet the one on the step rib that needs special handling.
  2. Sand off the top of the rivets and fill rivets with Bondo.
  3. Install landing lights.
  4. End rib installed (Jig needs to come off).
  5. Wing tip assembly riveted on and light installation.
  6. Composite filler for join between wing tip and skins. Perhaps other seams can use some filler?
  7. Put the aileron and flap on the wing to check for straightness of the trailing edge (Thanks Peter, I saw that on your blog! ;-)). Based on what I'm reading online it seems likely that I'll need to re-rivet some of the aileron/flaps to line up the trailing edges...  Wish I knew this before I had riveted them...
  8. Finish sanding of left wing bottom rivet heads.
  9. Finish right wing.
  10. Finally finish one of the composite tips of the elevator.
  11. Fill rivets of elevator with Bondo.
  12. START ON FUSELAGE!

Tuesday, March 15, 2016

2 hrs. riveting the bottom of the leading edge and fuel tank to the main spar.  Only 3 rivets remain on the bottom to be riveted, two near the pitot that I couldn't fit the rivet gun and another in which I need to shorten the rivet.


NEXT TASKS:
  1. Rivet the 3 bottom rivets that need special handling.  Also one on the step rib that needs special handling.
  2. Fill rivets with Bondo.
  3. Install landing lights.
  4. End rib installed (Jig needs to come off).
  5. Wing tip assembly riveted on and light installation.
  6. Composite filler for join between wing tip and skins. Perhaps other seams can use some filler?
  7. Put the aileron and flap on the wing to check for straightness of the trailing edge (Thanks Peter, I saw that on your blog! ;-)). Based on what I'm reading online it seems likely that I'll need to re-rivet some of the aileron/flaps to line up the trailing edges...  Wish I knew this before I had riveted them...
  8. Finish sanding of left wing bottom rivet heads.
  9. Finish right wing.
  10. Finally finish one of the composite tips of the elevator.
  11. Fill rivets of elevator with Bondo.
  12. START ON FUSELAGE!

Monday, March 14, 2016

1 hr. riveting the bottom of the leading edge and finishing the step rib skin riveting.

Also I found out about this Sling discussion forum that I wasn't aware of at all...

Still have to do the main spar rivets, but almost all of the rib riveting is done.

Shortened these rivets because they line up with rivets from below.  Didn't need to shorten the bottom ones.

All done!

NEXT TASKS:
  1. Rivet the bottom rivets of the main spar.
  2. Fill rivets with Bondo.
  3. Install landing lights.
  4. End rib installed (Jig needs to come off).
  5. Wing tip assembly riveted on and light installation.
  6. Composite filler for join between wing tip and skins. Perhaps other seams can use some filler?
  7. Put the aileron and flap on the wing to check for straightness of the trailing edge (Thanks Peter, I saw that on your blog! ;-)). Based on what I'm reading online it seems likely that I'll need to re-rivet some of the aileron/flaps to line up the trailing edges...  Wish I knew this before I had riveted them...
  8. Finish sanding of left wing bottom rivet heads.
  9. Finish right wing.
  10. Finally finish one of the composite tips of the elevator.
  11. Fill rivets of elevator with Bondo.
  12. START ON FUSELAGE!