Subcribe to our RSS feeds Join Us on Facebook Follow us on Twitter Add to Circles

Categories

Tuesday, August 30, 2016

1.5 hrs. installing the aileron autopilot servo and pushrod.

Making sure I have the right combination of bolt (AN3-10A), washers (AN3/4), locknut and Loctite 243.  Torqued to 32 in-lbs.

Tried doing the bottom two bolts and then installing in the wing spar only to find that I could not get it in the spar with the brackets installed....  Ugh...

Also found that using the recommended combination of washers on the pushrod conflicted with the mounting bolt.  Swapped a thin washer that was on the pushrod to the mounting bolt and the conflict ...

...went away.

All bolted in!  Loctited and properly torqued.   The vertical line of holes where you see the two 4mm cleco's are NOT riveted at this point because you will be riveting the floor ribs to these holes once the wing spar is moved into position.  You can see a bit of one of the floor ribs on the far right of the photo.

Other side view.

Sunday, August 28, 2016

2.5 hrs. drilling holes in the joystick supports and installing the elevator autopilot servo.

According to Peter's blog the factory now drills holes in the joystick supports, so here I'm locating where they'll be.  I don't think there's a required precise location, so I just eyeballed where Peter put them.

Pilot hole.

Drilled out and a test fit of a grommet.

Factory-provided CAD drawing of the Garmin servo install.

Lots of washers!  A couple of different sizes (AN3 and AN4) so note that.

Loctite 243 applied and here I'm testing the Friction Drag Torque before calculating the final applied torque: 28 in-lb (from table for AN3 with lock nut) + 4 in-lb (FDT) = 32 in-lb.

Starting to put the mounting bolts in when I realized...

That I hadn't riveted one of the mounting brackets yet so I could take the assembly out to do the two bolts for that bracket much easier than trying to do it in place.  Don't forget the Loctite 243 and proper torquing.

But, the two remaining bolts have to be done in place.  The top one wasn't so hard, but the bottom one.... was a bitch... Still got it on though with the Loctite 243 and the proper torque. ;-)  At this point I riveted in the right bracket and it was done!

Other side view.

I updated the task list.

Saturday, August 27, 2016

2.5 hrs. grinding down the holes that the elevator control tube and flap control tube pass through and contemplating some other things.

Also, I've moved the Task List to its own page so that it's easier for me to edit.  You can get to it directly from the link at the top of the page.

You need to grind down the holes that the tubes pass though so they don't pinch the bushings and inhibit the tube from turning freely.  I did this a few days ago for the elevator torque tube in an incremental manner, but I wanted to be smarter about it this time.
My first thought was to create a template that had an outer diameter that matched the groove diameter of the bushing, but this seemed to be tedious...

The next approach was to just take that groove diameter measurement and check all the holes with the brackets in place.  They all clearly needed grinding (I used a "flap" type sanding attachment for my Dremel).  So I did that for all of them.  Now this approach doesn't take into account if the holes are not perfectly lined up, so we'll see how it fits once I put the tubes back in.  That will have to wait until I receive the elevator control tube from South Africa.

I took out the outer ribs as I made my way into the center so I could get the Dremel in there.

 I noticed that these two sets of parts have strangely similar part numbers...  The ones on the left were the ones I was looking for.  They will go on the elevator control tube (once that arrives).

I want to put grommets into the holes that the rudder cable passes through and found these grommets that are just the right size.  But....  while they're plastic-ish rubber I don't think they're as tough as good edge grommet so I'll probably replace them.

Contemplating my servos...  Discovered I need to order some AN3-10A bolts as I don't have enough.

See the updated Task List here.

Tuesday, August 23, 2016

2 hrs. working on the elevator torque tube friction and starting to install the CF-BKT-019's on the landing gear channel.

Here's what the friction of the elevator torque tube was like before any modification:


Some grinding with my Dremel.  Took a few trials to grind them all down enough so it was virtually friction-less.

Two of the 3 were in good shape, but the last one in the middle of the fuselage took some time.  You can see here what the issue was.  A bunch still needed to come out in the upper right area.

And here's the after video.  Much better!


This is where CF-BKT-019 goes (not shown in the manual).  Had to ream out the holes in the landing gear bracket to 4.8mm since that was the hole size in 019.  Reamed them all out so tomorrow I'll clean and prime that part, make sure it's OK to install at this point and if so, rivet it in place on both sides of the fuselage.  EDIT: DO Not rivet or bolt at this time!  That's done later with the skins (and maybe other pieces) in place.

NEXT TASKS:
  1. Make dimensionally correct dummy wing spars to insert and bolt into position in the center fuselage so that the slot and it's uprights are properly spaced when it's being riveted into position.  Do this while the main spar is not cleco'ed to anything so that it's free to move.  This was recommended by various people so that the side skins don't buckle when the wing is finally installed (I saw this on the Sling 4 at OSH).  DONE.
  2. Fix landing gear uprights.  I have to reverse brackets that attach to the uprights. DONE.
  3. Redo rivets in rear cone.  I have 1 short vertical line of rivets that need to be up-sized to match the other side.DONE.
  4. Rivet rudder cable guides in place. DONE.
  5. Run wires through rear fuselage (see paper note #3). Peter's 6-8-2016 entry.  DONE.
  6. Fit aux. luggage floor gusset (needed for original rearward seat location?)  NOT INSTALLED FOR MORE REARWARD BACKSEAT LOCATION.  See above.
  7. Fit rear seat backrest stops for rearward location (see paper note #7).  See Gordon's 4/3/2016 entryCLECO'ED ON.
  8. Rivet main spar control and autopilot brackets (pg. E2).  Some holes should be drilled out to 4mm.  DONE.
  9. Ream out landing gear holes to proper size before main spar is in place. DONE.
  10. Install RF-ANG-019 Luggage Floor Support (see paper note #4). Peter's 6-13-2016 entry.  CLECO'ED IN PLACE.  <== THIS ISN'T CORRECT.  SEE BELOW.
  11. Do I have the flap actuator on hand?  Check the inventory list too.  Shown as "Back Ordered" on inventory list and can't find it in my inventory.
  12. Grind down all the bushing brackets for the various torque tubes.  STARTED on ELEVATOR TORQUE TUBE.
  13. Install CF-BKT-019-L/R on landing gear box.  RIVETED and BOLTED LATER.
  14. Clean and prime 019 and keep cleco'ed in place.  It will be riveted to the fuselage skin.
  15. Install elevator control stop on the torque tube (see paper note #2).  Peter's 5-4-2016 entry.  And 1-7-2016 entry.
  16. Cleco antenna plate for COM1 on top of rear fuselage.
  17. Install stops on servos.
  18. Install pushrods to servos (Loctite).
  19. Install servos and connections (see various paper notes).
  20. Rivet gear mounting channel before main spar is in place.  But, don't rivet to floor as that will have a cover installed later.
  21. See paper note #6.
  22. Deburr, Clean and Prime next batch of parts.
  23. Install luggage floor cross brace.
  24. Install RF-LGN-303-C-C-O as seen on Peter's 5-17-2016 entry.
  25. Where do these parts go?:
    1. RF-BKT-023-L/R
    2. CF-BKT-027-L/R 
  26. Install joystick control column.  See Peter's 5-13-2016 entry.
  27. 12mm hole in joystick support assembly.  See Peter's 5-2-2016 entry.
  28. Connect control stick brackets to main spar (Loctite)
  29. #8 locking rings for torque tubes?  See Peter's 5-4-2016 entry
  30. See Gordon's 4/3/2016 entry concerning flap torque tube installation.
  31. Test fit and rivet all control torque tubes (pg. E9).
  32. See Peter's 5-18-2016 entry on the control bushing mounting bracket install.
  33. Complete any work on Pg. E3/E4 of the fuselage manual (main spar & undercarriage channel).  Including drilling some holes for the 4 triangular parts that go under the main spar.
  34. Back seat floor support part.  See Peter's 5-17-2016 entry.
  35. Pg. E6 Forward Floor Sub-structure.
  36. Pg. E8 Center Console & Rudder Pedal Base.
  37. Center fuselage bottom skin riveting.  Some holes need enlarging to 4mm.
  38. Work on parachute box and rear bulkhead (pg. B6/D5)
  39. Fit elevator pushrod through rear fuselage.
  40. Longerons/stringers/rails of center fuselage (pg E12)?  Other work before join?
  41. Test fitting of forward fuselage side skins.
  42. Rear/Center Fuselage Join 
    1. Heads up: Need room to rivet 2nd longeron from the top on the center fuselage, so next one below shouldn't be installed until that is done.  See paper notes: #1, #5 and #8.
  43. Luggage support/strengthening channel - See Peter's 7-20- 2016 entry and 7-15-2016 entry.
  44. 5mm rivnuts for rudder cable springs.  See Peter's 7-15-2016 entry.
  45. What's the part on Peter's 6-13-2016 entry (middle picture)?
  46. Flap actuator bolted before riveting - investigate further.
  47. Do NOT rivet the outboard seat rails (pg E11).  See Peter's 4-26-2016 entry.
  48. Sound proofing installation. 
  49. Put BNC connector on RG-400 cables.
  50. Luggage floor installation (See pg. D4).  Don't forget RF-ANG-019 parts.
  51. Parachute box installation related (pg. 4).
  52. Make sure you understand where various spacers go in the center fuselage skins.
  53. CF-ANG-026-C-A goes on the bottom of the firewall.  See Peter's 8-20-2016 entry
  54. Rear top skins on at this point?
  55. Luggage door frame (pg. D6/D7).
  56. Work out the complete electrical system diagram.
  57. To be continued... ;-)
2 hr's over the last 2 days updating and extending my task list (again!) and cleaning and further organizing my workspace (am I obsessed? ;-)).  BTW, one of my motivations for cleaning and organizing is that the Boston Globe will be doing a feature on my Sling 4 build!  The interview is this Friday. :-)

I'll post a link once it's written and online.

Some of my new organization.

See the previous post for my latest task like (I just updated that post).

Monday, August 22, 2016

Extensively updated task list.

NEXT TASKS:
  1. Make dimensionally correct dummy wing spars to insert and bolt into position in the center fuselage so that the slot and it's uprights are properly spaced when it's being riveted into position.  Do this while the main spar is not cleco'ed to anything so that it's free to move.  This was recommended by various people so that the side skins don't buckle when the wing is finally installed (I saw this on the Sling 4 at OSH).  DONE.
  2. Fix landing gear uprights.  I have to reverse brackets that attach to the uprights. DONE.
  3. Redo rivets in rear cone.  I have 1 short vertical line of rivets that need to be up-sized to match the other side.DONE.
  4. Rivet rudder cable guides in place. DONE.
  5. Run wires through rear fuselage (see paper note #3). Peter's 6-8-2016 entry.  DONE.
  6. Fit aux. luggage floor gusset (needed for original rearward seat location?)  NOT INSTALLED FOR MORE REARWARD BACKSEAT LOCATION.  See above.
  7. Fit rear seat backrest stops for rearward location (see paper note #7).  See Gordon's 4/3/2016 entryCLECO'ED ON.
  8. Rivet main spar control and autopilot brackets (pg. E2).  Some holes should be drilled out to 4mm.  DONE.
  9. Ream out landing gear holes to proper size before main spar is in place. DONE.
  10. Install RF-ANG-019 Luggage Floor Support (see paper note #4). Peter's 6-13-2016 entry.  CLECO'ED IN PLACE.  <== THIS ISN'T CORRECT.  SEE BELOW.
  11. Do I have the flap actuator on hand?  Check the inventory list too.  Shown as "Back Ordered" on inventory list and can't find it in my inventory.
  12. Grind down all the bushing brackets for the various torque tubes.
  13. Install CF-BKT-019-L/R on landing gear box.
  14. Install elevator control stop on the torque tube (see paper note #2).  Peter's 5-4-2016 entry.
  15. Install stops on servos.
  16. Install pushrods to servos (Loctite).
  17. Install servos and connections (see various paper notes).
  18. Rivet gear mounting channel before main spar is in place.  But, don't rivet to floor as that will have a cover installed later.
  19. See paper note #6.
  20. Deburr, Clean and Prime next batch of parts.
  21. Install luggage floor cross brace.
  22. Install RF-LGN-303-C-C-O as seen on Peter's 5-17-2016 entry.
  23. Where do these parts go?:
    1. RF-BKT-023-L/R
    2. CF-BKT-027-L/R 
  24. Install joystick control column.  See Peter's 5-13-2016 entry.
  25. 12mm hole in joystick support assembly.  See Peter's 5-2-2016 entry.
  26. Connect control stick brackets to main spar (Loctite)
  27. #8 locking rings for torque tubes?  See Peter's 5-4-2016 entry
  28. See Gordon's 4/3/2016 entry concerning flap torque tube installation.
  29. Test fit and rivet all control torque tubes (pg. E9).
  30. See Peter's 5-18-2016 entry on the control bushing mounting bracket install.
  31. Complete any work on Pg. E3/E4 of the fuselage manual (main spar & undercarriage channel).  Including drilling some holes for the 4 triangular parts that go under the main spar.
  32. Back seat floor support part.  See Peter's 5-17-2016 entry.
  33. Pg. E6 Forward Floor Sub-structure.
  34. Pg. E8 Center Console & Rudder Pedal Base.
  35. Center fuselage bottom skin riveting.  Some holes need enlarging to 4mm.
  36. Work on parachute box and rear bulkhead (pg. B6/D5)
  37. Fit elevator pushrod through rear fuselage.
  38. Longerons/stringers/rails of center fuselage (pg E12)?  Other work before join?
  39. Test fitting of forward fuselage side skins.
  40. Rear/Center Fuselage Join 
    1. Heads up: Need room to rivet 2nd longeron from the top on the center fuselage, so next one below shouldn't be installed until that is done.  See paper notes: #1, #5 and #8.
  41. Luggage support/strengthening channel - See Peter's 7-20- 2016 entry and 7-15-2016 entry.
  42. 5mm rivnuts for rudder cable springs.  See Peter's 7-15-2016 entry.
  43. What's the part on Peter's 6-13-2016 entry (middle picture)?
  44. Flap actuator bolted before riveting - investigate further.
  45. Do NOT rivet the outboard seat rails (pg E11).  See Peter's 4-26-2016 entry.
  46. Sound proofing installation. 
  47. Put BNC connector on RG-400 cables.
  48. Luggage floor installation (See pg. D4).  Don't forget RF-ANG-019 parts.
  49. Parachute box installation related (pg. 4).
  50. Make sure you understand where various spacers go in the center fuselage skins.
  51. CF-ANG-026-C-A goes on the bottom of the firewall.  See Peter's 8-20-2016 entry
  52. Rear top skins on at this point?
  53. Luggage door frame (pg. D6/D7).
  54. Work out the complete electrical system diagram.
  55. To be continued... ;-)

Sunday, August 21, 2016

1.5 hrs. on center fuselage.  I'm going to update the task list again tonight since I got some new heads-up emails.  If you haven't noticed by now I really like to have my tasks be hyper organized and sequential, otherwise I slow down to a crawl because I'm unsure what's OK to do next...

The metal rings on the joystick tube are to hold the bushings in place and need to be riveted with 4 rivets each.  Thanks to Peter for pointing that out!

Moved the main spar so I could finish off the landing gear hole reaming.  All done!

Since I sized these brackets it seemed fine to rivet them together.  I did double check I could still thread them through the main spar.

Test fitting the "thingies" that hold down the bushings.  The top and bottom will need filing down to allow for a better fit - trying to turn the torque tube shows it's too tight.

Test fit of the elevator torque tube also shows it's too tight.  More filing.  Also the metal rings which butt up against the 3 bushings will need to be riveted in place.  I think....

So, does the aileron servo go in this way....

...or this way?  Hmm..  I feel like I've seen photos of it both ways, but I'm not certain.

Just a pic showing how the elevator autopilot servo attaches to the elevator torque tube.

Was informed by TAF that the green and blue parts in this picture do NOT get installed if you're intending for the back seat to be in the more rearward location, which I am.


NEXT TASKS:
  1. Make dimensionally correct dummy wing spars to insert and bolt into position in the center fuselage so that the slot and it's uprights are properly spaced when it's being riveted into position.  Do this while the main spar is not cleco'ed to anything so that it's free to move.  This was recommended by various people so that the side skins don't buckle when the wing is finally installed (I saw this on the Sling 4 at OSH).  DONE.
  2. Fix landing gear uprights.  I have to reverse brackets that attach to the uprights. DONE.
  3. Redo rivets in rear cone.  I have 1 short vertical line of rivets that need to be up-sized to match the other side. DONE.
  4. Rivet rudder cable guides in place. DONE.
  5. Run wires through rear fuselage (see paper note #3). Peter's 6-8-2016 entryDONE.
  6. Fit aux. luggage floor gusset (needed for original rearward seat location?)  NOT INSTALLED FOR MORE REARWARD BACKSEAT LOCATION.  See above.
  7. Fit rear seat backrest stops for rearward location (see paper note #7).  See Gordon's 4/3/2016 entryCLECO'ED ON.
  8. Rivet main spar control and autopilot brackets (pg. E2).  Some holes should be drilled out to 4mm.  DONE.
  9. Install servos and connections (see various paper notes).  Maybe next step first??
  10. Install pushrods to servos.
  11. Install CF-BKT-019-L/R on landing gear box.
  12. Ream out landing gear holes to proper size before main spar is in place. DONE.
  13. Rivet gear mounting channel before main spar is in place.  But, don't rivet to floor as that will have a cover installed later.
  14. See paper note #6.
  15. Install luggage floor cross brace.
  16. Install RF-LGN-303-C-C-O as seen on Peter's 5-17-2016 entry.
  17. Install RF-ANG-019 Luggage Floor Support (see paper note #4). Peter's 6-13-2016 entryCLECO'ED IN PLACE.
  18. Where do these parts go?:
    1. RF-BKT-023-L/R
    2. CF-BKT-027-L/R 
  19. Install joystick control column.  See Peter's 5-13-2016 entry.
  20. Install elevator control stop on the torque tube (see paper note #2).
  21. #8 locking rings for torque tubes?  See Peter's 5-4-2016 entry
  22. See Gordon's 4/3/2016 entry concerning flap torque tube installation.
  23. Test fit all control torque tubes
  24. See Peter's 5-18-2016 entry on the control bush mounting bracket install.
  25. Complete any work on Pg. E3 of manual (main spar & undercarriage channel).
  26. Pg. E6 Forward Floor Sub-structure.
  27. Work on parachute box and rear bulkhead.
  28. Flap actuator bolted before riveting - investigate further.
  29. Rear/Center Fuselage Join heads up: Need room to rivet 2nd longeron from the top on the center fuselage, so next one below shouldn't be installed until that is done.  See paper notes: #1, #5 and #8.
  30. Luggage support/strengthening channel - See Peter's 7-20- 2016 entry and 7-15-2016 entry.
  31. Sound proofing installation. 
  32. Test fitting of forward fuselage side skins.
  33. Make sure you understand where various spacers go in the center fuselage.
  34. To be continued... ;-)

Saturday, August 20, 2016

3 hrs. doing misc center fuselage tasks.

Peter Calley alerted me to the fact that I shouldn't have riveted together the main spar control bracket because the bushing is already on the joystick assembly as you can see here.  Oops...  Time for some de-riveting....

De-riviting...

The beautiful Garmin servos.

The joystick sits in an assembly that the bushing slides into (Here are the two back to back).  One slid right in, but the other was too tight.  You can see the one on the right is narrower.  So I took a file to it until the joystick bushing slid in.

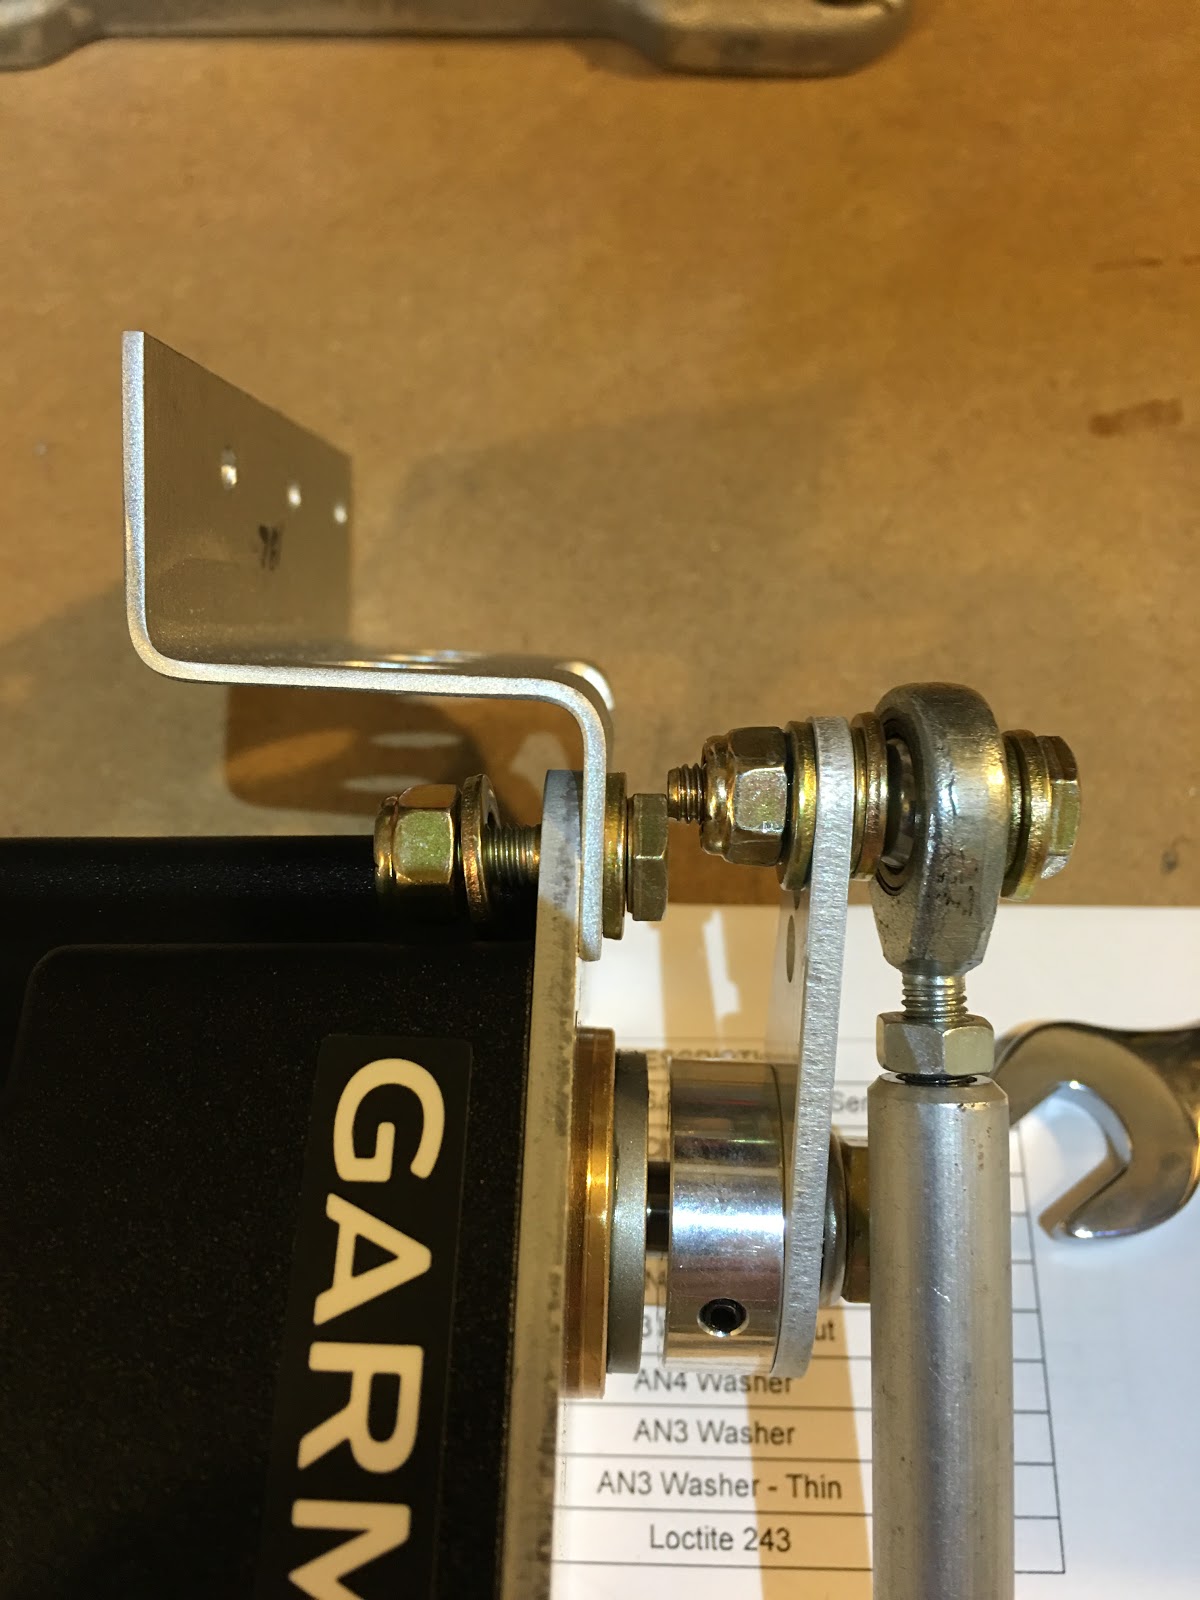
The aileron servo has to attach here so those two rivets I did yesterday had to go...

The main spar control bracket was also too tight so I took a file to that until it slid in comfortably (the stick could rotate freely (but not too lose...)).  Flat file for the flat area and a half-round for the curved area which also required filing.

Several test fits to get it just right.

I like the way this looks. :-)

Pushrod for the aileron servo.

Pushrod for the elevator servo.  The manual says to use M5 bolts that come with the servos to attach the servos to the brackets, but mine did not... So I don't have those parts...  Grumble grumble...   EDIT: Help from others and a read of the Garmin install manual says you use AN3-4A bolts, etc, so I probably have that... Off to check in the garage.... NOPE, don't have those...  Every size except that one... :-/

Started reaming out the landing gear attachment holes to 10mm (they came out of the factory too small).  Not done with this as I need to move the main spar to get to the front holes.

NEXT TASKS:
  1. Make dimensionally correct dummy wing spars to insert and bolt into position in the center fuselage so that the slot and it's uprights are properly spaced when it's being riveted into position.  Do this while the main spar is not cleco'ed to anything so that it's free to move.  This was recommended by various people so that the side skins don't buckle when the wing is finally installed (I saw this on the Sling 4 at OSH).  DONE.
  2. Fix landing gear uprights.  I have to reverse brackets that attach to the uprights. DONE.
  3. Redo rivets in rear cone.  I have 1 short vertical line of rivets that need to be up-sized to match the other side. DONE.
  4. Rivet rudder cable guides in place. DONE.
  5. Run wires through rear fuselage (see paper note #3). Peter's 6-8-2016 entryDONE.
  6. Fit aux. luggage floor gusset (needed for original rearward seat location?)  WAITING FOR ANSWER FROM SA.
  7. Fit rear seat backrest stops for rearward location (see paper note #7).  See Gordon's 4/3/2016 entryCLECO'ED ON.
  8. Rivet main spar control and autopilot brackets (pg. E2).  Some holes should be drilled out to 4mm.  DONE.
  9. Install servos and connections (see various paper notes).  Maybe next step first??
  10. Install pushrods to servos.
  11. Install CF-BKT-019-L/R on landing gear box.
  12. Ream out landing gear holes to proper size before main spar is in place. STARTED.
  13. Rivet gear mounting channel before main spar is in place.  But, don't rivet to floor as that will have a cover installed later.
  14. See paper note #6.
  15. Install luggage floor cross brace.
  16. Install RF-LGN-303-C-C-O as seen on Peter's 5-17-2016 entry.
  17. Install RF-ANG-019 Luggage Floor Support (see paper note #4). Peter's 6-13-2016 entryCLECO'ED IN PLACE.
  18. Where do these parts go?:
    1. RF-BKT-023-L/R
    2. CF-BKT-027-L/R 
  19. Install joystick control column.  See Peter's 5-13-2016 entry.
  20. Install elevator control stop on the torque tube (see paper note #2).
  21. #8 locking rings for torque tubes?  See Peter's 5-4-2016 entry
  22. See Gordon's 4/3/2016 entry concerning flap torque tube installation.
  23. Test fit all control torque tubes
  24. See Peter's 5-18-2016 entry on the control bush mounting bracket install.
  25. Complete any work on Pg. E3 of manual (main spar & undercarriage channel).
  26. Pg. E6 Forward Floor Sub-structure.
  27. Work on parachute box and rear bulkhead.
  28. Flap actuator bolted before riveting - investigate further.
  29. Rear/Center Fuselage Join heads up: Need room to rivet 2nd longeron from the top on the center fuselage, so next one below shouldn't be installed until that is done.  See paper notes: #1, #5 and #8.
  30. Luggage support/strengthening channel - See Peter's 7-20- 2016 entry and 7-15-2016 entry.
  31. Sound proofing installation. 
  32. Test fitting of forward fuselage side skins.
  33. Make sure you understand where various spacers go in the center fuselage.
  34. To be continued... ;-)

Friday, August 19, 2016

3 hrs. wiring and misc. center fuselage tasks.  EDIT: I've edited this post, see below.

5-core trim wire routed through.

RG-400 Coax for COM1 antenna on top routed.

Aileron control brackets assembled.  EDIT: Do Not rivet these pieces!  The bushings are on the joystick assembly and need to be fitted/sized into these brackets before you can close these up.

In place.  Missing mounting hardware (M4 x 16mm button head screws and associated washers and nuts), so parts are being sent from CA.  EDIT: Do not rivet this aileron servo assembly until the servo is attached.

Wires coiled up.

Had to put the main spar on it side in order to rivet the autopilot brackets. EDIT: Don't rivet these now.

These had to be hand pulled since I couldn't get the pneumatic rivet gun in there.  Also needed to bend the end rivets to pull those.

In place.  The line of holes where the cleco's are will not be riveted yet as they connect to the floor ribs.

NEXT TASKS:
  1. Make dimensionally correct dummy wing spars to insert and bolt into position in the center fuselage so that the slot and it's uprights are properly spaced when it's being riveted into position.  Do this while the main spar is not cleco'ed to anything so that it's free to move.  This was recommended by various people so that the side skins don't buckle when the wing is finally installed (I saw this on the Sling 4 at OSH).  DONE.
  2. Fix landing gear uprights.  I have to reverse brackets that attach to the uprights. DONE.
  3. Redo rivets in rear cone.  I have 1 short vertical line of rivets that need to be up-sized to match the other side. DONE.
  4. Rivet rudder cable guides in place. DONE.
  5. Run wires through rear fuselage (see paper note #3). Peter's 6-8-2016 entryDONE.
  6. Fit aux. luggage floor gusset (needed for original rearward seat location?)  WAITING FOR ANSWER FROM SA.
  7. Fit rear seat backrest stops for rearward location (see paper note #7).  See Gordon's 4/3/2016 entryCLECO'ED ON.
  8. Rivet main spar control and autopilot brackets (pg. E2).  Some holes should be drilled out to 4mm.  DONE.
  9. Install servos and connections (see various paper notes).  Maybe next step first??
  10. Install pushrods to servos.
  11. Install CF-BKT-019-L/R on landing gear box.
  12. Ream out landing gear holes to proper size before main spar is in place.
  13. Rivet gear mounting channel before main spar is in place.  But, don't rivet to floor as that will have a cover installed later.
  14. See paper note #6.
  15. Install luggage floor cross brace.
  16. Install RF-LGN-303-C-C-O as seen on Peter's 5-17-2016 entry.
  17. Install RF-ANG-019 Luggage Floor Support (see paper note #4). Peter's 6-13-2016 entryCLECO'ED IN PLACE.
  18. Where do these parts go?:
    1. RF-BKT-023-L/R
    2. CF-BKT-027-L/R 
  19. Install joystick control column.  See Peter's 5-13-2016 entry.
  20. Install elevator control stop on the torque tube (see paper note #2).
  21. #8 locking rings for torque tubes?  See Peter's 5-4-2016 entry
  22. See Gordon's 4/3/2016 entry concerning flap torque tube installation.
  23. Test fit all control torque tubes
  24. See Peter's 5-18-2016 entry on the control bush mounting bracket install.
  25. Complete any work on Pg. E3 of manual (main spar & undercarriage channel).
  26. Pg. E6 Forward Floor Sub-structure.
  27. Work on parachute box and rear bulkhead.
  28. Flap actuator bolted before riveting - investigate further.
  29. Rear/Center Fuselage Join heads up: Need room to rivet 2nd longeron from the top on the center fuselage, so next one below shouldn't be installed until that is done.  See paper notes: #1, #5 and #8.
  30. Luggage support/strengthening channel - See Peter's 7-20- 2016 entry and 7-15-2016 entry.
  31. Sound proofing installation. 
  32. Test fitting of forward fuselage side skins.
  33. Make sure you understand where various spacers go in the center fuselage.
  34. To be continued... ;-)