Subcribe to our RSS feeds Join Us on Facebook Follow us on Twitter Add to Circles

Categories

Thursday, July 26, 2018

Back from AirVenture!

Pascal and I out shopping.  How happy do we look! ;-)

I only dine at the best places!  This is Gardina's and behind us are John and Martha King and the former AOPA President Phil Boyer.  Dinner was followed by my other must-do, going to Leon's Frozen Custard. :-D

I need to figure out the part numbers of the fuses (I assume that's what they are) used with the two solenoids I'll be getting from Aircraft Spruce.

I took a informal survey of the OAT probe mounting choices (it was roughly 50/50 between mounting straight out and from the top (shown)) and I think I'll go with this approach.

Formation over OSH18.

Wednesday, July 25, 2018

2 hrs. this past Sunday with Pascal (and his long arms! :-)) getting the nosewheel pushrods done.

Pascal reaching in to get the nosewheel rod end's finally in place.  His long reach was able to do what I couldn't.  Not to say it was easy...  It took us about 2 hours to finally get them both in correctly..

Yay!  Thanks Pascal!  Wonderful hosting you and Yvonne in our home! :-)

The other end.

Success! :-D

And now we're, the Three Amigos, at Oshkosh!  Here we are sitting in BobZ's beautiful Sling 2!


Thursday, July 19, 2018

1 hr. mostly realizing I should have done something before I put the side skins on...

My LPS #2 arrived and from SteinAir I got the special diode I'll need.  This is the diode seen in the diagram a few posts below, between the VP-X and the main fuel pump.  I sprayed the #2 on the nose wheel rose joints.  Super slippery stuff.  I tried to ensure the lubricant only went on the joint and not the threads of the pushrod (as best I could).  NOTE: This is not for lubricating things like wheel bearings, etc.  You grease those (read your manual...).

Man I wish I had put in the nosewheel rose joints before putting on the side skins...  Nearly impossible to get to it (even from inside the cockpit...) and put together the assembly including the two bushings seen here.  I think the only way I'm going to accomplish this is to put a temporary wooden dowel through the bushings and rose joint so I can slip that whole thing in place and then push it out with the bolt.  Hope that works...  BTW, I've updated the Build Order page to make sure it's clear this assembly should be done early...  The manual shows the bolts being put in place, but makes no mention of the rose joint that needs to go there (I suppose it should have been obvious...).

Wednesday, July 18, 2018

1.5 hrs. fiddling and diddling...

After lots of reading (here's a discussion on an RV board on the subject), watching some videos and consulting with various people I decided I'm going to use LPS #2 for any rod end bearings not exposed to the elements and the Aeroshell #22 grease for any exposed bearings (applied manually to rod end bearings).  If you read the board linked above you'll see several people mention Triflow lubricant, which also looks interesting.. :-b....

Using my Depstech endoscope I tried to see if I'd have any issues with the rivnuts in the gear channel.  Here you can see (this photo with my iPhone) that there are a few rivnuts that are further out into the channel than most of them.

This is a closeup using the endoscope of one of the rivnuts that sticks out further, with the crossbeam mostly up, but definitely not all the way into position.  It definitely looks like pushing the crossbeam up further will impinge on the rivnut.  Hmmm.....

 Got my relay from SteinAir.

Figured I'd make the coax cables for the GPS antennas (video showing how to do it)...  Stripped...

Connector on...

...and right angle connector on that...

In place and ready for the antenna.  Two made.

Tuesday, July 17, 2018

Since I've had trouble greasing my rod end bearings I've started to research what others do.  Seems like some people use LPS 2 for this purpose, but I'm checking with the factory to see what they do.

Meanwhile, I came across this useful EAA video on lubricants (he does mention rod end bearings).


An article with some related info (showing lubing rod end bearings).
Heard from a couple of people that, yes indeed, the holes in my main gear should have metal sleeves.  So, I took a closer look...

Turns out that the flat lighting in my garage made it hard to see if there were sleeves.  But, with a flashlight I could just see them.  Whew...

Monday, July 16, 2018

1 hr. putting one bolt in the main gear.

With two people it wasn't too difficult to get one top bolt through the gear.  Here's looking down the channel from the other side.  Heck if I can tell whether it needs more bevel to clear the rivnuts on the top right.  When you lift it, you can't see if there's clearance...  Is there clearance by design?

This is with this side lifted up.  I'll definitely have to do what BobZ did and spread the gear to make the bolt holes fit on both sides.  QUESTION: The four bolt holes in the gear are just fiberglass, is that correct?  No metal sleeves to strengthen them?

Sunday, July 15, 2018

1 hr. mostly being frustrated...

Received the diodes I'll use for the solenoids.  I also ordered from SteinAir the Bosch/Tyco relay with an embedded diode that was in the diagram I posted the other day.  You can get more specs on it here.  If you read about it on other websites you'll see that this is a "boat" relay, which I assume means it's designed to take some bouncing around without disconnecting.  I noticed on Amazon, which has many generic Bosch-like relays, that there were comments from people who tried to use those copycat relays and had issues with disconnecting when they hit waves.  We would not want to have the same issue in our airplanes....  So, probably not a good idea to use a generic copycat relay....

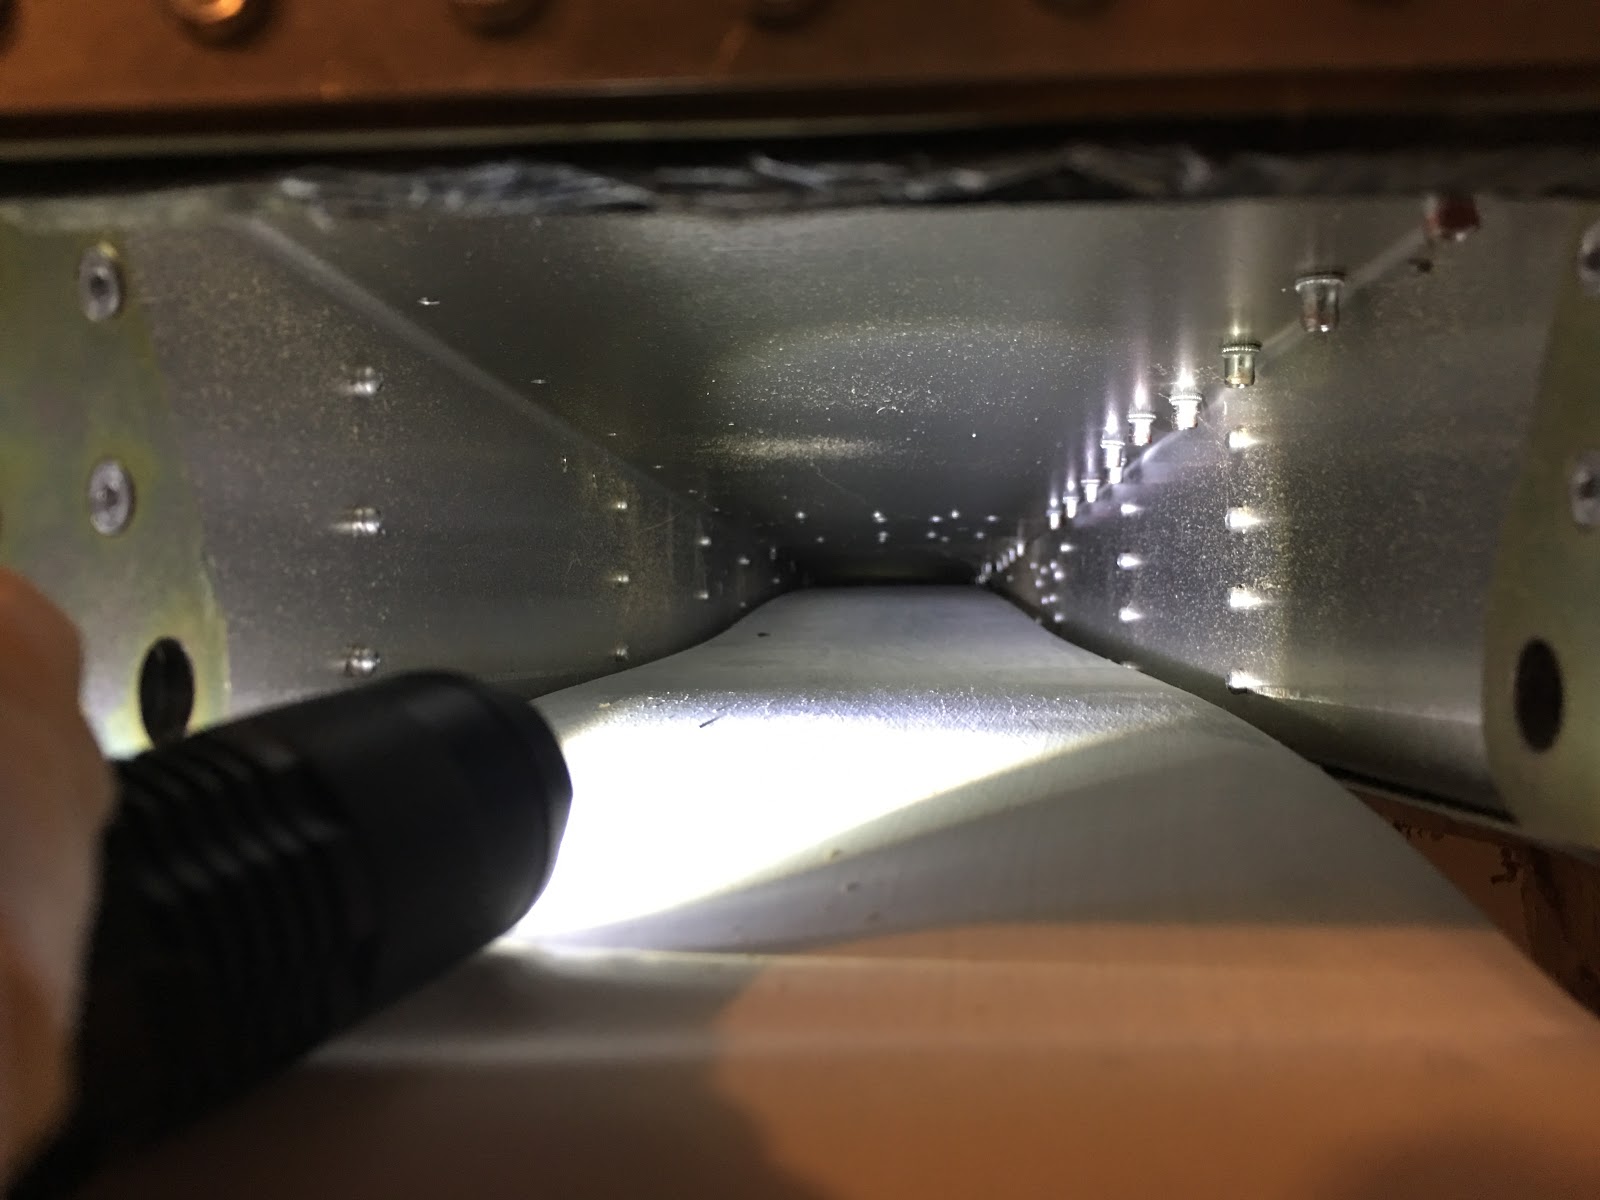
Another good reason not to install the outer seat rails - access to the holes for the main gear.

And we can see it through here too.  After trying for 20 minutes I realized I wasn't going to be able to thread the bolt into the gear by myself...  Maybe someone else figured out how to do it yourself, but I couldn't.  Tomorrow I'll get spouse help - one person to hold the gear in position and the other to thread the bolt through.  This exercise is to make sure there's enough bevel on the gear crossbeam to avoid the rivnuts that poke down into the channel.

Well, since I couldn't do the gear I figured I'd try greasing the pushrods for the nose wheel...

Loaded the grease gun and pumped...  Only to have it simply squirt out the sides and not at all into the tiny hole I wanted it to go in.  Am I doing it wrong, or do I just have a nozzle that's too big or not the right type?  Searching on Amazon shows a large selection of nozzles and it's not clear which is the right one...

No pictures, but after those two fails I tried a 3rd thing to do: Make the coax connectors for the GPS antennas...  I searched high and low, but I couldn't find my diagonal cutters to do the job properly.  Fail #3.  3 strikes and I'm out...

Saturday, July 14, 2018

2 hrs. on splitting the workbench.  Spent a couple of sweaty hours on this (with a couple of friends helping!).

Line drawn for the bottom cut...

Using my trusty Sawzall...

You weren't expecting a clean cut with a Sawzall, were you?.....

After moving the fuselage back and forth to make the cut (the upper surface cut is not as nice as the lower one... But, this isn't a beauty contest...), the table is split and the channel lined up over it.

And ready to start the test fitting.  This should be interesting...

Friday, July 13, 2018

Anybody know what's the device pointed to by the arrow?


This is from the diagram given to me by Stein.  I'm trying to put my Oshkosh buy list together and this one I can't figure out.

Thursday, July 12, 2018

1 hr. on the workbench split.

Cross supports in...

And all the new legs are in.  Saturday I'll start the process of cutting them apart with my Sawzall.

Wednesday, July 11, 2018

1 hr. on firewall and work on splitting the workbench.

Fuel pump bracket attached with M5 buttonhead screws.

Shield temporarily held in place with M4 buttonhead screws.

Wood cut for the Big Divide...  Tomorrow I'll screw those in place and I'll be ready for the cuts (which will require some help in sliding the fuselage forward).  My plan is to slide the fuselage so that the channel will be over where I need to cut.  That way I don't need to lift the fuselage at all to achieve the cuts.

Tuesday, July 10, 2018

Will anybody be heading from OSH to the Chicago O'Hare area on Wednesday (5 PM +/-) of AirVenture?  Looking to hitch a ride (and share expenses of course!).

Sunday, July 8, 2018

2 hrs. misc.

Last night I got to see one of my favorite "bands", Steely Dan (I hesitate to call it a band since, at this point, it's just one guy left from the two that made up the "band").  I consider Donald Fagen a musical genius.

Though it's not mentioned in the manual, I riveted these 4 holes under the cabin heat splitter.

I ordered some heat-resistant silicone gasket material for underneath.

Well, you can see the brush strokes of the fire-resistant paint, but that's OK.  After two coats of that I sprayed on a few coats of the high-heat gray spray paint.  That middle M3 screw is a bit tricky to screw in, but I managed to do it.

Assembled the fuel pump bracket, and that will go here (once I either find M5 screws or order some...).

Looking good.

I consulted with a civil engineer friend and what he suggested is what I'm going to do for the test fitting and bolting in of the landing gear:

  1. Move the fuselage forward so the firewall hangs over the edge (so I can put on the engine mount and nose gear) and I'll also lift it up unto some cushioned 2x10 pieces that will stretch across both in front of and behind the main gear channel.  
  2. Then I'm going to put some 2x4's underneath the table, across where I intend to cut the workbench.
  3. Put some new legs on the sides where those 2x4's are located.
  4. Then I can go ahead and cut out the section between the 2x4's.

Voila, I have easy access to do test fitting of the main gear!

Saturday, July 7, 2018

2.5 hrs. mostly on wheels.

Ready to assemble one main wheel.  Valve lined up with the red dot (not the purple unknown dot).

Working the o-ring (As instructed I put dishwashing liquid on it) under the tire.

And it's inflated!

Starting on the other wheel...

Hmm, this hub didn't just come apart after the bolts were removed.  A few hits with the mallet and it reluctantly came apart.

The manual says to partially inflate the tube to do this, but I think it's better not to.  Easier to get in.

Finished that other main wheel, so now let's see if the new Goodyear nose wheel tube is any better...

And the nut caught!! :-)  I still used my thinned shoulder washer and I think that was necessary.

Three inflated tires!!  Now let's get that main gear in place so we can get this baby on to it's wheels.  First I need to figure out the logistics of test fitting the main gear in the channel.  I need to have a gap in the plane's support lined up with the channel so I can easily do multiple fits.  Hmm...