


I was looking through my copy of the Aviation Mechanic Handbook last night. It's actually quite good and is a quicker reference than AC43.13 for a lot of info. It also has tons of info on tools that the FAA doc doesn't have.
Wednesday, May 29, 2019

Tuesday, May 28, 2019
1 hr. on the firewall pass-through.
Cut some 3/4" fire shield for the conduits. I'll slice one side so it can be wrapped around the wiring. There will be worm type clamps around the fire shield.

Cutting the heat shields.

Made cutouts for the screws, but I'm not sure I like the way that looks (not that that matters really...). Was going to try just making holes for the screws, but it's not that easy to make small holes in it. Maybe I'll try again using a punch of something for the screw holes...

Cut some 3/4" fire shield for the conduits. I'll slice one side so it can be wrapped around the wiring. There will be worm type clamps around the fire shield.

Cutting the heat shields.

Made cutouts for the screws, but I'm not sure I like the way that looks (not that that matters really...). Was going to try just making holes for the screws, but it's not that easy to make small holes in it. Maybe I'll try again using a punch of something for the screw holes...

Monday, May 27, 2019
4 hrs. fabricating the electrical pass-through for the firewall.
If you have to fabricate.... it takes time...
My parchment paper tracing to locate the screw holes worked well.

Making sure this is where I want to put them.

The holes need to be larger than the above parts, so a rough sketch will do.

Holes drilled out with a step drill bit and holes drilled and reamed for the rivets. Line drawn for where I'll cut it in half.

And drawn on the pass-through pieces.

And on the heat shield I'll apply later.

A bit anxious about doing these cuts...

...because the cutting disks break so easily.... As it did within a couple of minutes. Heads-up: Wear a full face shield, gloves, hold the Dremel firmly and keep yourself out of the plane of rotation....

These disks ended up being better than the thin cut disks. Still need to keep the tool steady to keep the disk in the intended plane of the cut, otherwise it's more likely to end up breaking the disk.

Whew.... glad that's done!

Test fit to see where I need to cut the firewall to clear the holes and rivets.

This should do just fine.

This setup will make it easier to get in there and cut. Heads-up: Much of the work on the firewall would have been easier without the mount in the way.....

Took awhile, but it's done.

Test fit and it's looking good. Hope to finish this off tomorrow night.

If you have to fabricate.... it takes time...
My parchment paper tracing to locate the screw holes worked well.

Making sure this is where I want to put them.

The holes need to be larger than the above parts, so a rough sketch will do.

Holes drilled out with a step drill bit and holes drilled and reamed for the rivets. Line drawn for where I'll cut it in half.

And drawn on the pass-through pieces.

And on the heat shield I'll apply later.

A bit anxious about doing these cuts...

...because the cutting disks break so easily.... As it did within a couple of minutes. Heads-up: Wear a full face shield, gloves, hold the Dremel firmly and keep yourself out of the plane of rotation....

These disks ended up being better than the thin cut disks. Still need to keep the tool steady to keep the disk in the intended plane of the cut, otherwise it's more likely to end up breaking the disk.

Whew.... glad that's done!

Test fit to see where I need to cut the firewall to clear the holes and rivets.

This should do just fine.

This setup will make it easier to get in there and cut. Heads-up: Much of the work on the firewall would have been easier without the mount in the way.....

Took awhile, but it's done.

Test fit and it's looking good. Hope to finish this off tomorrow night.

Sunday, May 26, 2019
An hour starting to make the dual conduit pass-through for the firewall.
Cut the stainless steel sheet for the pass-through.

Probably going with this arrangement.

Used some parchment paper to transfer the rivnut locations to the blank. Should finish this tomorrow...

Visited my bro in NJ this past weekend and checked out the airport I think I'll use to visit him (just 25 minutes to his house). Lincoln Park (N07). Looks nice.


VFR route 6B6 to N07
Cut the stainless steel sheet for the pass-through.

Probably going with this arrangement.

Used some parchment paper to transfer the rivnut locations to the blank. Should finish this tomorrow...

Visited my bro in NJ this past weekend and checked out the airport I think I'll use to visit him (just 25 minutes to his house). Lincoln Park (N07). Looks nice.

Nice MU-2 in this hanger.

VFR route 6B6 to N07
Make your Flight Plan at SkyVector.com
Thursday, May 23, 2019
An hour mostly contemplating....
Terminals to use for the cap?

Maybe like this? The cap certainly seems firmly connected to the terminals, but maybe it would be better to put the wires and cap into the same terminals for a more secure connection? Some heat shrink too for better protection? Hmm... As Einstein would have said, "I must tink" 🤓😊

Trying to make sure I have the spacing right based on the appearance in the manual. I'm a bit concerned about the clearance between the bottom of the assembly and the bottom edge of the firewall...

...So I'm thinking of flipping the mount so the slots for the mounting clamps would be on the top and I can slide the pumps up a bit and the clamps would be in the center of the pumps. That would give me more clearance.

Side view showing what I mean with the mounts in place. With this positioning the clamps are right in the middle.

Terminals to use for the cap?

Maybe like this? The cap certainly seems firmly connected to the terminals, but maybe it would be better to put the wires and cap into the same terminals for a more secure connection? Some heat shrink too for better protection? Hmm... As Einstein would have said, "I must tink" 🤓😊

Trying to make sure I have the spacing right based on the appearance in the manual. I'm a bit concerned about the clearance between the bottom of the assembly and the bottom edge of the firewall...

...So I'm thinking of flipping the mount so the slots for the mounting clamps would be on the top and I can slide the pumps up a bit and the clamps would be in the center of the pumps. That would give me more clearance.

Side view showing what I mean with the mounts in place. With this positioning the clamps are right in the middle.


Wednesday, May 22, 2019
1.5 hrs. on the firewall.
Trying to figure out how to arrange the two wire pass-throughs. Like this....

...or like this? I have a piece of thick stainless steel (thanks Kerry!) that I will split in half, I'll split these pass-throughs and rivet them to the two sheet halves. That will be screwed to the rivnuts shown. That way I'll be able to pass through connectors and secure the wiring properly.

Meanwhile, I got connectors I can use for the battery sense wire. Fits!

I could have sworn I had a crimper for insulated terminals, but I didn't. I have crimpers for un-insulated terminals, and many other types, but not insulated. So, I bought these.

Done! Still needs to be tied down somehow though.

Enlarged the holes for the grommets for the fuel lines. The grommets have an ID (hole size) of 1 1/16", but I made the holes 1" so they would be snug. Test fit here, but I realized I needed to cut away the heat shield some more so it would seat right.

And both done! Nice!

And a nice snug fit!

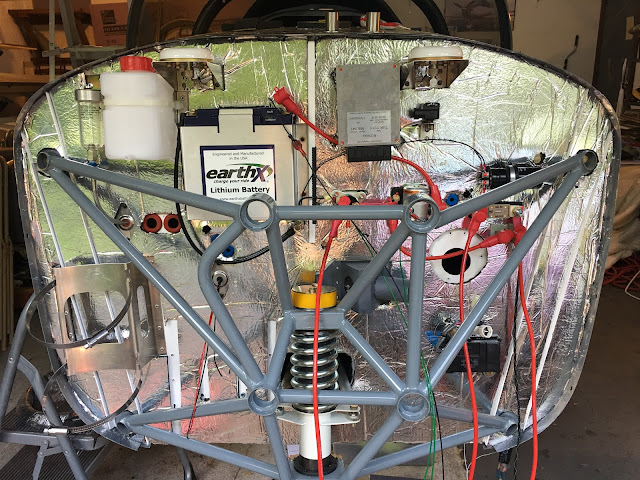
The big view. Took the fuel pump mount off, which will make it easier to mount the pumps assembly to them.
These are the throttle cables. Anybody know what the heat shrink is for?

Trying to figure out how to arrange the two wire pass-throughs. Like this....

...or like this? I have a piece of thick stainless steel (thanks Kerry!) that I will split in half, I'll split these pass-throughs and rivet them to the two sheet halves. That will be screwed to the rivnuts shown. That way I'll be able to pass through connectors and secure the wiring properly.

Meanwhile, I got connectors I can use for the battery sense wire. Fits!

I could have sworn I had a crimper for insulated terminals, but I didn't. I have crimpers for un-insulated terminals, and many other types, but not insulated. So, I bought these.

Done! Still needs to be tied down somehow though.

Enlarged the holes for the grommets for the fuel lines. The grommets have an ID (hole size) of 1 1/16", but I made the holes 1" so they would be snug. Test fit here, but I realized I needed to cut away the heat shield some more so it would seat right.

And both done! Nice!

And a nice snug fit!

The big view. Took the fuel pump mount off, which will make it easier to mount the pumps assembly to them.

These are the throttle cables. Anybody know what the heat shrink is for?

Subscribe to:
Posts (Atom)